I’ll admit it. I’m not the most mechanically-inclined person out there. The fact that I learned to disassemble (and most importantly, reassemble) a chainsaw would probably make my freshman year shop teacher’s head explode. But after talking to Ken Urakawa of CrossFit Southwest in Tempe, Arizona, he made it sound like making a medicine ball at home was the easiest thing in the world. “Besides,” he said, “There’s tons of videos on Youtube about it.”
Ten minutes of terrible youtube videos later – I convinced myself I could do it. Plus, you can only watch a guy pour sand into a basketball for so long before your mind starts drifting. As you know we are huge fans of basketball in our house. When we are not playing a game or two ourselves, you can find us placing bets on FanDuel and other sports betting sites. It is just so exciting trying to predict which team will win! As for this DIY project though, the cheapskate part of my personality loved the idea of saving money. There was no turning back. The course was set. I was going to make a medicine ball. Had I ever really trained with a medicine ball before? Not really. But watching videos of people doing wall ball and slam ball workouts looked pretty rugged. Picking up a 20lb medicine ball, hoisting it over your head, then slamming it to the ground is infinitely cooler than doing situps. So after watching YouTube videos with slam balls, I was determined to make one.
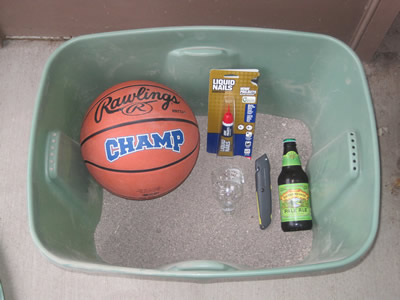
The Supplies
- One Basketball
- One Adhesive Product. Liquid Nails is recommended.
- One Utility Knife
- One Water Bottle (cut in half for use as a funnel + a scoop.
- Athletic Tape
- One Bottle of Beer. Something with flavor and more than 64 calories is preferable
 I had to go to two different Goodwill stores before I found a basketball. And when I got to the second store, I bought the only one they had. This leads me to believe that finding used basketballs might be a bit more difficult than people let on. Total cost: $3.99. I thought that was high, and almost thought about putting it back. Then common sense smacked me across my face and said “shopping around” for something that costs $3.99 or less is absurd. Common sense demanded that I buy It, so I did.
Next, I ventured over to my local Ace Hardware. I like buying stuff from Ace stores because they’re locally-owned. You pay a bit more, but I like the idea of supporting family-run businesses. Anyway, I bought some Liquid Nails adhesive. There were a ton of adhesives to choose from. I read online that Liquid Nails was the product to buy. Who am I to doubt the wisdom of the internet? Total price w/tax: $4.91. The thing that chaps me about buying specialized glue is that stupid container of liquid nails is going to sit unused in a drawer for the next decade, 90% filled. But I digress.
The next step was finding something to fill the medicine ball with to give it weight. The overwhelming fill of choice was sand. I stole my sand from the Tempe Town Lake beach, which is less than a mile from my home. I initially felt conflicted about it, then remembered the countless number of dust storms that I’ve been caught in here in Arizona. The less sand to swirl about the air, sandblast my vehicle, and contaminate my cocktails, the better. I was doing a service for the community by removing sand from the beach. Senator McCain, I expect to be recognized from the floor for my self-less acts.
Total cost: free.
That was it. I already had a utility knife, and I dug an empty water bottle out of our recycling bin to make a scoop and a funnel.
Total Cost of Supplies = $8.90.
The Bottomline:
Factoring in just the cost of the supplies, you’re looking at saving 50% by making your own medicine ball vs. purchasing one off of Amazon.com. However, you don’t generate referral fees for Hotshot Fitness by making your medicine balls at home. Just saying. You’re the one who has to live with your decisions. Not me 🙂 Kidding. Sort of.
Making the Medicine Ball
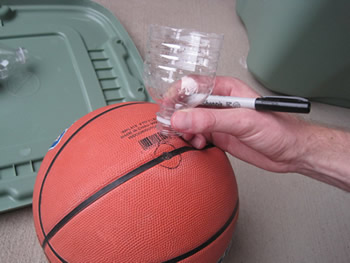
Find your entry point.
I decided to cut around the black rubber thing where you stick the pump needle. My reasoning: central location, and…I don’t know. I just decided to cut there. So I took my funnel, placed it over the black spot, and drew a circle.
I decided to make two cuts so that the flap in the ball was triangular. I figured that would be easier to patch, and the best way to insert a funnel.
With a steady hand, I hacked an opening in the ball. It went smoothly. Until I pulled back the flap and discovered …
The Secret Nipple!
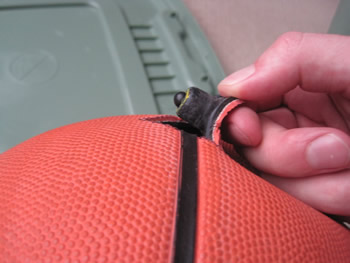
Turns out I picked the worst place to cut an opening in a basketball. Literally any other spot on that ball would have been better. Such is my luck. Turns out, it wasn’t much of a problem. I was still able to muscle the funnel into the opening I created, and it fit snugly.
Perfect. But if I were going to do it again, I’d cut somewhere else.
Fill’er Up
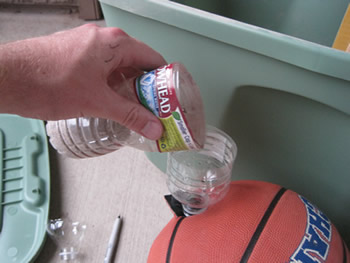
This was the most labor intensive part of the project. I thought I was pretty clever by using the water bottle for both a funnel, and a scoop. But I quickly realized that the new Arrowhead plastic water bottles with less plastic have about as much rigidity as wet spaghetti. Scooping sand was a pain in the ass. Unfortunately, I live in an apartment, and was embarrassed to discover that I have zero digging implements. Not a shovel or a trowel to be found. I was stuck with it.
Looking back on it, I’d recommend just about anything else for the job.
Towards the end, as it started to fill up, I had to shake the ball to keep re-settling the sand to make room, but overall, it filled pretty quickly. However, I was shocked to see how much sand I actually used. I thought I had stolen enough sand to fill a school playground, but by the time I was finished, I used way more than I thought I was going to. Lesson: when stealing sand, always take more than you think you’ll need.
Sealing it up
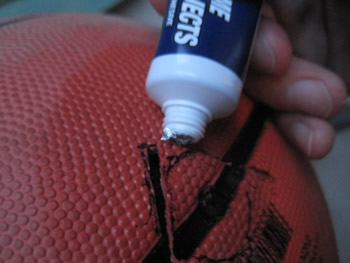
All that was left to do was to seal it up and let it cure. I wiped the area off with a damp paper towel, and then coated the edges of the flaps with a healthy amount of glue. I used my utility knife to wedge the flap flush with the rest of the basketball’s surface. This was effective, in accomplishing the job, but effectively ruined the knife as I got glue on the inside of it (I didn’t realize that till later of course). Once it was smooth, I coated over the incision points with entirely too much glue.
But I believe strongly that more = better.
After all, I planned on raising this thing above my head and slamming it onto pavement. I wasn’t about to be stingy with the glue.
And that was it.
The whole process from start to clean-up took about a beer’s worth of time – maybe 30 minutes.
The Weight
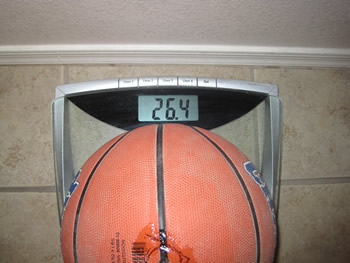 The next day, I brought the medicine ball in to the house to weight it. Thing felt heavier than I thought it was going to. All the stuff I read online said to expect the ball to be about 20 pounds. The sand that I had stolen from Tempe Town Lake Beach was wicked fine, which led me to think at the beginning that my ball might be a bit lighter than others made with coarser sand. Wrong.
The finer the sand, the more densely it compacts. So I now have a medicine ball that weighs in at 26.4 lbs. Which is fine. Just a bit heavier than I thought. But it’s good motivation to get stronger.
After some thought I decided to tape over the puncture to give it some added protection. I had some black athletic tape lying around the house, so I just took that out and threw a few overlapping strips over the hole. I considered wrapping the entire ball in tape, and just thought that might be overkill. We’ll see how this holds up.
What do you do with a Medicine Ball? Well, it’s a versatile piece of equipment. CrossFit training utilizes it quite extensively. Do push-ups on it, use it for weighted situps, do wall balls and slam balls – you’re only limited by your creativity. Also, there’s a few decent books out there that might be handy to keep around the house. We like The Great Medicine Ball Handbook: The Quick Reference Guide to Medicine Ball Exercises” the best. With a title like that – how can you go wrong?
UPDATE:
After a few months of use, these homemade medicine balls have a tendency to blowout if you do a lot of wall slams. My advice – duct tape over the patched hole. Wrap the circumference of the ball with a few good lines of duct tape and call it good.
1 Comment