Thinking About Making the Jump?
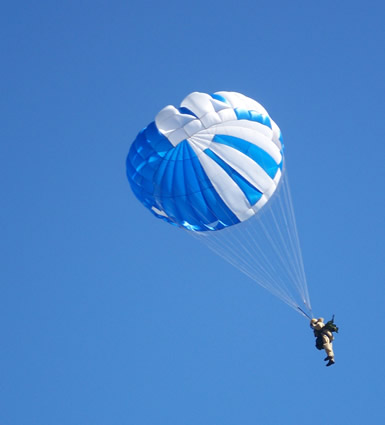
Smokejumping. There’s freedom, prestige and a sense of majesty that comes with floating from the sky onto a fire. Rookie training is notoriously brutal, and the fact that you’re an airborne firefighter grants smokejumpers a special status among their peers, mildly similar to the divide that exists between grunts and special forces operators in the military. If you’re a smokejumper, you’re a badass. That’s all there is to it.
Ernest Hemingway himself couldn’t have invented a more masculine job. Put on armor. Load into plane with fellow warriors. Fly to desolate wilderness area. Look for fire. Jump out of plane. Avoid impaling oneself on tree limbs during landing. Pick up battle axe. Attack fire. Rest. Attack it again. Hike home victorious.
Thinking more about it – who wouldn’t want to be a smokejumper? Well, like anything in life, there’s some pros and cons and compromises that you should consider first before submitting your application.
Flexible vs. Structured: Smokejumpers are a notoriously loose bunch. Hotshot crews..not so much. If you love structure, rigid hierarchy, tool orders, and an iron-clad command and control structure, you might want to stick with hotshotting. On a jumper fire, the first person to land is the IC. That means you could have a rookie bossing around a 10-year veteran. Some people thrive in this environment, others don’t.
Fire Assignments: Smokejumpers are an initial attack resource. Hotshots are an extended attack resource. Smokejumpers live on a steady diet of lighting-started fires. They get in quick, scratch some line, hook it, and call it good. They take their packs off when they work (or so we’ve heard). They don’t hike in tool order. Hell, they don’t even HAVE a tool order. When it gets big and ugly, they turn it over to the hotshots. So if you love burn shows, and have a panic attack when you see a handline with anything less than a six foot saw cut and a three foot scrape…you should probably stick to hotshotting.
What do you want to do in fire? As a smokejumper, you’ll be able to pile on a lot more certifications than you would on a hotshot crew. If you have aspirations to be on an IC team, or to be division, jumping for a few years might be a great career move. You’ll gain valuable experience with coordinating logistics, handling paracargo operations, managing helispots, and other aspects of the aviation-side of firefighting that you just can’t get as a hotshot. Plus, it’s great for street cred. If you can make it through rookie training, and hold your own as a jumper, that says a lot about your physical fitness, and your mental fortitude. The fire world is a macho culture – it always will be. Knowing that you had “SMKJ” on your hard hat earns you some serious points.
If you love running the saw, and that’s the only thing you want to do, you might not want to be a smokejumper. When jumpers land, it’s a free-for-all for the tools. If you land late, you might be cutting line with a pulaski. You have to be alright with that. As a hotshot, if you’re on saw team – you’re running the saw no matter what.
Money. During a busy season, you’re probably going to bank roughly the same amount regardless of whether you’re on a hotshot crew or jumping says Ramona Atherton, a smokejumper out of McCall, Idaho. “We get more per hour, but during a slow year like the 2010 fire season, [jumpers] have fewer opportunities for OT [overtime].” Atherton also added that jumpers have more opportunities for off-season work (Smokejumpers regularly travel to New York City, Chicago, and even Worcester, Mass to assist with urban tree work and invasive species eradication programs.)
During a slow year, hotshots benefit most from the nature of their assignments. Smokejumpers are utilized in the early stages of an incident. If they can’t control a fire within a day or two, extended attack resources (e.g. hotshot crews) are called in, and the smokejumpers return to base. Smokejumpers don’t spend 14 days on a fire, mopping it up. Any hotshot will tell you that the money is in the mop-up. The shifts can be agonizingly boring, but that’s where you get the bulk of your overtime and hazard pay.
If you’re seriously considering becoming a smokejumper, get a few seasons under your belt as a hotshot, preferably in the region where you want to jump. For instance, if you want to jump out of Missoula, consider working on the Lolo Hotshots. You’ll have the opportunity to cross paths with their overhead, and get a sense of their culture, and maybe even cut some line with them on a fire or two on forest. When hiring season comes along, that familiarity with help boost your chances considerably.
Oh, and definitely read Murray Taylor’s autobiography “Jumping Fire”. It’s hysterical and will put you about two beers and a dare away from submitting your application to jump AK.
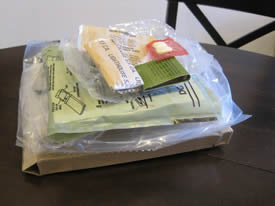
Conserve precious space in your line gear by slimming down your MRE
Every wildland firefighter must pack a Meals-Ready-Eat, or MRE, in their line gear. Loathed by most hotshots for their cafeteria food taste and rumored by many to do horrible things to a man’s regularity, MREs are the red-headed stepchildren of fireline nutrition. While they’re a far cry from gourmet fare, after a hard shift on the line, even freeze-dried spaghetti boiled up while Reagan was in office can satisfy a firefigher’s hunger.
And since Papa Johns isn’t going to start delivering to wilderness areas anytime soon, munching down MREs will continue to be the only option when you’re on Initial attack.
What’s ‘Field Stripping’ and why should I do it?
While field stripping might sound like a debauched game played by rednecks in the Ozarks after a few too many, it’s just a catch-all term for breaking down gear. You can field strip a rifle, a cigarette, and yes, even a MRE.
So why do it? There are a couple reasons. The primary reason for field-stripping a MRE is space. Your line gear isn’t exactly overflowing with room. Field stripping allows you to remove all the extra packaging and other junk to help you conserve space in your line gear. It won’t buy you a ton of extra room, but every inch counts.
The second is customization. If you hate Peach Cobbler, and that’s one of the items in the MRE that you’re carrying- why the hell are you going to hump that thing all over the woods? In hopes that when you’re eating on the line, you might be able to trade for it? Maybe you will, maybe you won’t. Our advice: Ditch it, or swap it out for an extra tube of Jalapeno cheese spread, tuna, or more nutritious line gear snacks that’ll help your muscles recover much better than a slice of preservative-laced pie.
Warning! Before you field strip your MRE, you should check with your overhead about whether or not it’s alright to do this. Some crews allow it, others don’t. By opening the bag, you’re breaking the seal, and voiding the expiration date on the MRE. Since the MRE is government property, you’d better listen to your Captain. Given the volume of MREs that hotshot crews eat, it shouldn’t be an issue. Still, check with your supervisor first.
The Process
Field stripping a MRE is a fairly straight-forward process. Here’s how to do it:
Step 1: Cut a hole in the box. Just kidding. That’s for something else.
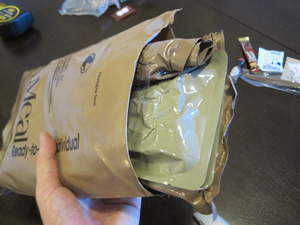
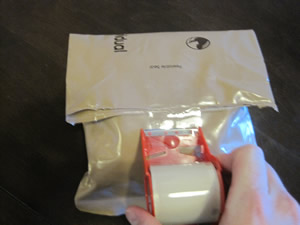
Step 1 (seriously): Peel open the MRE and spread the contents out to see what you’re dealing with.
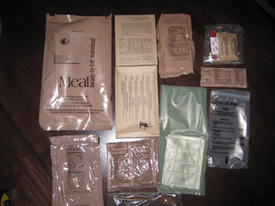
You’ll immediately notice that the both the entree and the desert are packaged in cardboard. This is excessive packaging, and should be one of the first things that you rip out. Unless you’re interested in sharing your MREs unique nutritional information with your crewmembers, toss it.
Next, you’ll notice the heater bag. MREs taste terrible cold, lukewarm, or hot. Do you really need to warm them up? The meals are pre-cooked anyway, and perfectly safe to eat at room temperature. Our opinion: Save the heater bags for making 2 liter soda bottle bombs (1 heater bag + 8-12oz of water, screw cap on tight and hurl a safe distance away. Good for a nice bang.)
Then there’s the cracker, or the wheat bread snack. Dry and crumbly, it’s only edible with massive quantities of cheese spread. Our opinion: toss it, and replace it with a baggie full of almonds or walnuts.
Also, there’s usually a powdered beverage. In the sample MRE that we used, it was a lemon-lime sports drink. A generic Gatorade knock-off. We decided to keep it, but rolled it-up to condense its size. But often times, the powdered beverage will be apple cider or a strawberry shake. Some people love’em, we here at HF have never been particularly fond of dehydrated diary products, so we usually take it out. Also, you didn’t hear it from us, but some Marines we know say the hot cider mixes well with whiskey. Just saying.
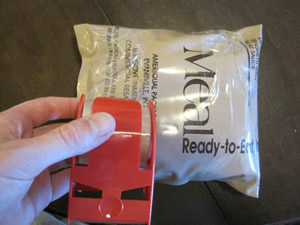
Step 2: Examine the condiments bag.
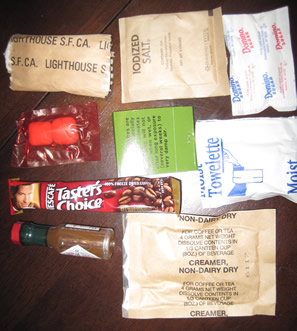
First, there’s toilet paper in a paper roll. You don’t need this sandpaper. Besides, you’ve got toilet paper in a Ziploc bag in your cargo pocket (if you don’t – you’re nuts.) Anyone venturing into the woods should have toilet paper in a plastic bag. You don’t want to be dependent upon the generosity of your crew members when nature calls in the backcountry. Trading a six-pack of beer for a few sheets of TP is stupid. But you deserve to be extorted if you don’t carry toilet paper on you. .
Second – matches. Really terrible matches. You’re already carrying a lighter, possibly two in your pocket. Do you need Vietnam-era jungle matches that have a 50/50 chance of lighting? No.
And the gum? Seriously? Who chews gum? There’s no nicotine in that. At least not the kind that comes with the meal. Especially dried-out, cracked gum with no discernible taste. We’ve purchased more delicious bubble gum from children in Tijuana. And it’s tough, if not impossible, to chew gum with a juicy mouthful of Copenhagen. Adios, Chicklets.
We’d recommend giving the same treatment to the non-dairy creamer, the salt, and the sugar. If you’re a coffee drinker, not a bad idea to keep the Taster’s Choice coffee. It ain’t good, but it’s got caffeine. Otherwise, dump it.
By the time you’re finished rifling through your MRE, you should have a mound of trash like this.
Step 3: Put it all back together again.
This should be self-explanatory. Take the stuff you want, and stuff it in. Don’t really think any further explanation should be required for this.
Step 4: Tape it up
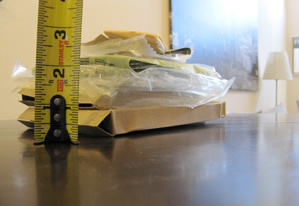
How much room did you save?
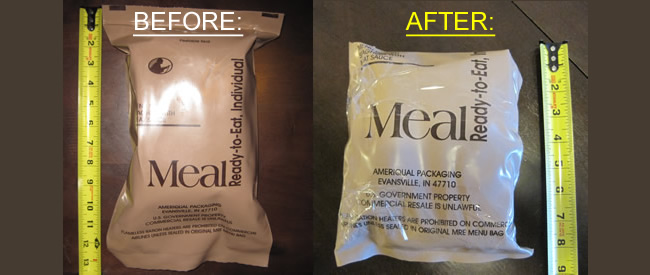
Here are the dimension of the original MRE:
Volume = (4 1/2″ wide) x (9″ Long) x (3″ tall) = 121.5 inches^3
After the MRE was field stripped, the volume was:
Volume = (6″ wide) x (7 1/8″ long) x (2 1/4″ tall) = 96.1875 inches^3.
So, by field stripping an MRE, you’re able to reduce the total volume by 21%.
How much weight did you shave?
Truthfully, not all that much. The original MRE weighed 758g. After it was field stripped, that dropped to 656g, for a total savings of 102g. Which is a little over 3oz. Pretty negligible.
All in all, a reduction in volume by 21%, in addition to having the luxury of customizing what you’ll be munching on the fireline makes field stripping your MRE a no-brainer.
I’ll admit it. I’m not the most mechanically-inclined person out there. The fact that I learned to disassemble (and most importantly, reassemble) a chainsaw would probably make my freshman year shop teacher’s head explode. But after talking to Ken Urakawa of CrossFit Southwest in Tempe, Arizona, he made it sound like making a medicine ball at home was the easiest thing in the world. “Besides,” he said, “There’s tons of videos on Youtube about it.”
Ten minutes of terrible youtube videos later – I convinced myself I could do it. Plus, you can only watch a guy pour sand into a basketball for so long before your mind starts drifting. As you know we are huge fans of basketball in our house. When we are not playing a game or two ourselves, you can find us placing bets on FanDuel and other sports betting sites. It is just so exciting trying to predict which team will win! As for this DIY project though, the cheapskate part of my personality loved the idea of saving money. There was no turning back. The course was set. I was going to make a medicine ball. Had I ever really trained with a medicine ball before? Not really. But watching videos of people doing wall ball and slam ball workouts looked pretty rugged. Picking up a 20lb medicine ball, hoisting it over your head, then slamming it to the ground is infinitely cooler than doing situps. So after watching YouTube videos with slam balls, I was determined to make one.
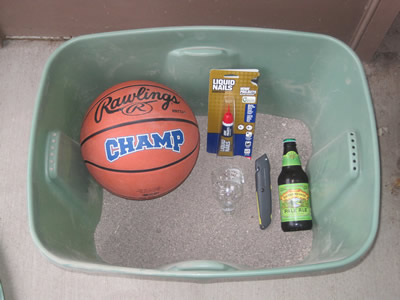
The Supplies
- One Basketball
- One Adhesive Product. Liquid Nails is recommended.
- One Utility Knife
- One Water Bottle (cut in half for use as a funnel + a scoop.
- Athletic Tape
- One Bottle of Beer. Something with flavor and more than 64 calories is preferable
 I had to go to two different Goodwill stores before I found a basketball. And when I got to the second store, I bought the only one they had. This leads me to believe that finding used basketballs might be a bit more difficult than people let on. Total cost: $3.99. I thought that was high, and almost thought about putting it back. Then common sense smacked me across my face and said “shopping around” for something that costs $3.99 or less is absurd. Common sense demanded that I buy It, so I did.
Next, I ventured over to my local Ace Hardware. I like buying stuff from Ace stores because they’re locally-owned. You pay a bit more, but I like the idea of supporting family-run businesses. Anyway, I bought some Liquid Nails adhesive. There were a ton of adhesives to choose from. I read online that Liquid Nails was the product to buy. Who am I to doubt the wisdom of the internet? Total price w/tax: $4.91. The thing that chaps me about buying specialized glue is that stupid container of liquid nails is going to sit unused in a drawer for the next decade, 90% filled. But I digress.
The next step was finding something to fill the medicine ball with to give it weight. The overwhelming fill of choice was sand. I stole my sand from the Tempe Town Lake beach, which is less than a mile from my home. I initially felt conflicted about it, then remembered the countless number of dust storms that I’ve been caught in here in Arizona. The less sand to swirl about the air, sandblast my vehicle, and contaminate my cocktails, the better. I was doing a service for the community by removing sand from the beach. Senator McCain, I expect to be recognized from the floor for my self-less acts.
Total cost: free.
That was it. I already had a utility knife, and I dug an empty water bottle out of our recycling bin to make a scoop and a funnel.
Total Cost of Supplies = $8.90.
The Bottomline:
Factoring in just the cost of the supplies, you’re looking at saving 50% by making your own medicine ball vs. purchasing one off of Amazon.com. However, you don’t generate referral fees for Hotshot Fitness by making your medicine balls at home. Just saying. You’re the one who has to live with your decisions. Not me 🙂 Kidding. Sort of.
Making the Medicine Ball
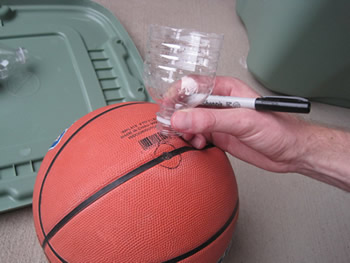
Find your entry point.
I decided to cut around the black rubber thing where you stick the pump needle. My reasoning: central location, and…I don’t know. I just decided to cut there. So I took my funnel, placed it over the black spot, and drew a circle.
I decided to make two cuts so that the flap in the ball was triangular. I figured that would be easier to patch, and the best way to insert a funnel.
With a steady hand, I hacked an opening in the ball. It went smoothly. Until I pulled back the flap and discovered …
The Secret Nipple!
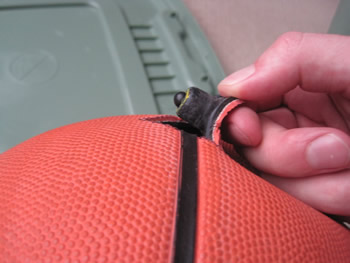
Turns out I picked the worst place to cut an opening in a basketball. Literally any other spot on that ball would have been better. Such is my luck. Turns out, it wasn’t much of a problem. I was still able to muscle the funnel into the opening I created, and it fit snugly.
Perfect. But if I were going to do it again, I’d cut somewhere else.
Fill’er Up
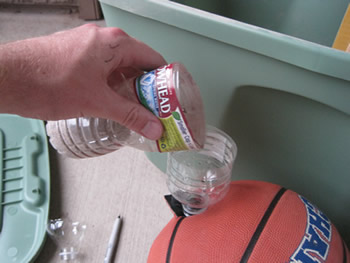
This was the most labor intensive part of the project. I thought I was pretty clever by using the water bottle for both a funnel, and a scoop. But I quickly realized that the new Arrowhead plastic water bottles with less plastic have about as much rigidity as wet spaghetti. Scooping sand was a pain in the ass. Unfortunately, I live in an apartment, and was embarrassed to discover that I have zero digging implements. Not a shovel or a trowel to be found. I was stuck with it.
Looking back on it, I’d recommend just about anything else for the job.
Towards the end, as it started to fill up, I had to shake the ball to keep re-settling the sand to make room, but overall, it filled pretty quickly. However, I was shocked to see how much sand I actually used. I thought I had stolen enough sand to fill a school playground, but by the time I was finished, I used way more than I thought I was going to. Lesson: when stealing sand, always take more than you think you’ll need.
Sealing it up
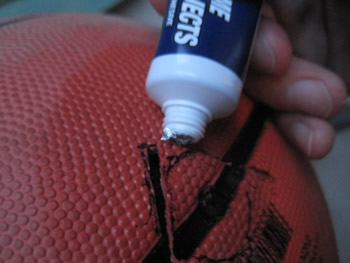
All that was left to do was to seal it up and let it cure. I wiped the area off with a damp paper towel, and then coated the edges of the flaps with a healthy amount of glue. I used my utility knife to wedge the flap flush with the rest of the basketball’s surface. This was effective, in accomplishing the job, but effectively ruined the knife as I got glue on the inside of it (I didn’t realize that till later of course). Once it was smooth, I coated over the incision points with entirely too much glue.
But I believe strongly that more = better.
After all, I planned on raising this thing above my head and slamming it onto pavement. I wasn’t about to be stingy with the glue.
And that was it.
The whole process from start to clean-up took about a beer’s worth of time – maybe 30 minutes.
The Weight
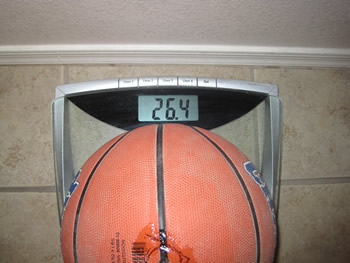 The next day, I brought the medicine ball in to the house to weight it. Thing felt heavier than I thought it was going to. All the stuff I read online said to expect the ball to be about 20 pounds. The sand that I had stolen from Tempe Town Lake Beach was wicked fine, which led me to think at the beginning that my ball might be a bit lighter than others made with coarser sand. Wrong.
The finer the sand, the more densely it compacts. So I now have a medicine ball that weighs in at 26.4 lbs. Which is fine. Just a bit heavier than I thought. But it’s good motivation to get stronger.
After some thought I decided to tape over the puncture to give it some added protection. I had some black athletic tape lying around the house, so I just took that out and threw a few overlapping strips over the hole. I considered wrapping the entire ball in tape, and just thought that might be overkill. We’ll see how this holds up.
What do you do with a Medicine Ball? Well, it’s a versatile piece of equipment. CrossFit training utilizes it quite extensively. Do push-ups on it, use it for weighted situps, do wall balls and slam balls – you’re only limited by your creativity. Also, there’s a few decent books out there that might be handy to keep around the house. We like The Great Medicine Ball Handbook: The Quick Reference Guide to Medicine Ball Exercises” the best. With a title like that – how can you go wrong?
UPDATE:
After a few months of use, these homemade medicine balls have a tendency to blowout if you do a lot of wall slams. My advice – duct tape over the patched hole. Wrap the circumference of the ball with a few good lines of duct tape and call it good.
Running